Welcome to Cranky Puppy Farm!

This blog belongs to two Gen X-er's smackdab in downtown Kansas City where we've been renovating and decorating two old Victorians built in the 1890's. Our life is filled with 3 demanding Pomeranians (1 of them cranky, of course), honking cars, noisy neighbors and the hustle and bustle of city life but we dream of the day when we can move to our 40-acre farm and hear nothing but the wind and the cows next door. Until then, we're chronicling our triumphs and mishaps here as we try to garden and preserve on 2 city lots, raise chickens, and learn all those things we should have learned from our grandparents. Welcome to our world - we hope you'll stay awhile!

Showing posts with label crafts. Show all posts

A Fresh Look for the Patio Chairs

Sunday, June 09, 2013

Spring, spring, spring!  Actually, I guess it's almost summer, isn't it?  Oh well...I'm just so happy to be out of the house and in the garden and the yard.  I'm working on quite the farmer's tan right now.  And the garden is growing nicely, the flowers are in bloom, the birds are a-chirpin' and the air smells fresh from an overnight rain.

But hold the fort! That patio set that we've had for years is looking a little tired - especially since the roofers scratched  some of the chairs by dropping shingles on them.  So I thought, why not give them a little facelift?

Painting the Table and Chairs

This set has an enamel finish from the factory and it was in decent shape (no chipping paint or rough spots).  I never really liked the color, though ,as it's a light beige and I always wants a dark bronze or black iron set.  This is the perfect opportunity to set things right with some Rustoleum spray paint.  I started by powerwashing the chairs and table and letting them dry for a good 24 hours.  If you have a set that has chipping paint or a glossy finish, you'll also want to lightly sand the entire chair\table with either sandpaper or steel wool first.  Perhaps the most important part of the process is the prep and it's absolutely necessary that the surface be structurally sound and completely dry.

While the chairs were drying, J. and I were standing in Strasser's Hardware agonizing over which color paint to use on them.  Our house is a darker beige with white trim and black accents.  We finally decided that black was too dark and picked Rustoleum's hammered bronze paint and bought a couple of cans to test with.  The nice thing about the hammered finish paint is that it's very forgiving about overspraying (drips) and uneven surfaces. 6 cans later, we were finally done spraying and the table and chairs looked like new.   You'll see them in a picture further down this post.

Now on to....

Recovering the Seat Cushions

I'm really picky about fabrics and I searched all over for cushions that I liked when we first got the patio set.  When I finally found some that I liked, they only had 3!  And they couldn't order a 4th because they were closeout cushions.  Just my luck.  So one of our chairs hasn't had a cushion for years.  These were really nice cushions with a zipper in the back - a nice feature because you can remove the cover and wash it or replace the padding if you need to.

Which brings us to...

Step 1. Remove the existing cushion cover.
 
I suppose could just cut the ties off and leave the existing cover.  But the primary reason for doing this is so that you can use the existing cover as a template for the new one. 
 
My old cushion.  I like the pattern, but the brown is kind of boring.  Did I mention that I hate brown?

Step 2.  Measure for your fabric and gather supplies

My chairs just have bottom seat covers, so this was pretty easy.  If you've got the larger cushions that cover both the back and seat bottom, make sure you flatten out the paddding so that you get an accurate measurement.  In my case the cushions are 18" deep by 20" wide.

If you don't have cushions and want to make some, just measure your seat depth and chair width.  If you're making full cushions for both the seat and back, you'll need to include the chair height as well.  And remember, when you fold the cushion to put it on the chair, you'll love some length.  I'd add a couple of inches to the length of the cushion to account for that.

TIP FOR THOSE STARTING FROM SCRATCH:  The easiest way to determine your fabric size is to cut your foam padding first. My foam is 1.5 inches thick.  If you're sewing a full cushion, you don't want to go any thicker than that because it will be hard to sew through.  Place your foam on the chair, fold it to contour with the chair and then trim it to fit.  Now you've got a template to work with for the other chairs and you can determine your fabric sizes by measuring around your foam piece.  (Just be sure to add a bit to the length and width, to account for the thickness of the foam.)

For my 4 bottom-only seat cushions, I had the following shopping list. 

  • Outdoor fabric - 2.5 yards (always give yourself a little extra!)
  • Extra strong thread in coordinating color (1 spool was enough)

TIP:  Make sure you buy OUTDOOR FABRIC that has been pre-treated to withstand the weather. 
 

So off I went to Joann's.  I had spotted some gorgeous red swirly outdoor fabric the week before but it was gone by the time I got back there.  I even had them call 3 other stores and all of them were out.  Agh!  So I settled for the same pattern in chic black instead. With several 50% off coupons, the total came to just over $20 after tax.

Step 3. Measure and cut the fabric for the cushions.

I  wanted to rectify the missing 4th cushion situation, and a discounted cushion for $4 at Home Depot was just the ticket.  This one didn't have a zipper in the back, but the foam was the same size as my existing cushions.  So I ripped the back seam out of the cover, turned it inside out, and used it as the template for cutting out the fabric for my new ones.


Fold your new fabric in half and then pin the old cushion on top of the new fabric so that it stays in place while you cut around it.  Make a note of the seam allowance on the old fabric.  Mine were 3/8".

TIP:  Notice how the corners are rounded?  You can leave the corners straight, but then you'll have very pointy corners in the stiff fabric and it won't look right.  If you're creating new cushions from scratch, fold the fabric in half and round off two corners at the same time.  Then fold it in half the other way and use the rounded corners as a guide for the other corners.  That will give you 4 corners that are exactly the same.


Step 4.  Cut and sew the fabric for the ties.

Next up, I used the leftover fabric scraps to cut strips for the ties.  The ties on my existing cushions were 12" long, but I wanted them to be a little longer. So I cut the remaining fabric down into 16" long strips, then turned the fabric 90 degrees and cut it into 2" strips.  Each chair takes 4 strips, so I cut a total of 16 of these. 


Outdoor fabric is stiff and really hard to sew into a tube and then turn right side out.  So, instead, I folded each strip in half lengthwise and pressed it.  Then I opened it up and folded each edge in toward the center fold and pressed again.


Then sew the strip closed on the open edge.  What you end up with is a strip that is about a 1/2" wide.  Then fold over one end of the strip by 1/4 inch and then again by 1/4 inch and sew it into place.  You only need to do this on one end per strip, as the other end will be attached to the cushion.

Step 5. Sew the covers together.

Now go back to the cushion fabric and remove one of the pieces.  Place two of the strips in the middle of the rounded corners on the back of the cushion so that the strips are facing in toward the middle of the cushion and the edges are lined up with the edges of the seat fabric (as shown below). 


If you're starting from scratch, you'll have to look at the chair to determine the best place where you can tie the cushion on. The bottom ties should sit right above where the fold of the cushion should be.

Now you're ready to sew the cushion together.  Replace the top piece of fabric, make sure everything matches up, pin everything together so that it doesn't move around as you're sewing, and then sew along the edges.  My original cushions used a 3/8" seam, so I did the same on the the new ones.  Remember to leave the back open so that you can put the padding in.  I started sewing about an inch before where the ties were pinned, continued around the cushion, and then stopped about an inch past the 2nd set of ties.  When you're done, flip the cushion inside out and it will look like this:


Step 6.  Assemble the cushions and final sewing.

Now stuff the padding into the new covers and adjust it so that it fits nicely.  Then fold the edges of the opening toward the inside by 1/2 inch and hand-stich the opening closed.

TIP:  If you're doing a full cushion, you're not quite done.  You'll need to find where the center fold should be and do a straight-stitch across the middle.

And here's one of the "new" patio chairs sporting its shiny new paint job and new cushion!

I think it needs a pop of color, don't you?  Maybe a red or orange pillow.

This project was "sew" simple and (not counting waiting for the chairs to dry) it only took me a couple of hours to do the painting and covers.  The total cost was just $48 ($20 for fabric and $28 for paint). In fact, it was so easy that I wish I had done it years ago.  If you're tired of looking at those old patio chair and cushions and don't want to spend a fortune on new ones, why not try your hand at making them beautiful again?  If I can do it, YOU can do it.

And now I'm off to make a girlie drink and enjoy the new patio. That is, after I finish up a carrot cake for J.'s niece.  It's her 19th birthday tomorrow and she' requested pizza dinner, so we'll be joining them for that this evening.  I hope she likes the carrot cake - I'll be posting my recipe for that later this week so you can make it and enjoy it also.  It is THE best carrot cake recipe ever.  I promise.

Later, gators....


I'm sharing this with the Clever Chicks, Sunday Showcase, Sunny Simple Mondays, Ready,Set, Pin, Making the World CuterMasterpiece Monday, Made By You, Keeping It Simple, Creative Bloggers Party, More the Merrier, Craft-O-Matic Mondays, Make the Scene Monday, Make It Pretty Monday, Tutorials and Tips Linky Party, Get Your Craft On, Monday Funday, and Mop It Up Monday blog hops.

Make-Yer-Own Seed Packets

Saturday, March 02, 2013

With all this cold and 4 days off work for snow in the past week, I've had some time on my hands to work on getting our life organized after spending just about every waking hour working on the 1893 Victorian.  I'm looking forward to getting the tools and paint out of our laundry room and finishing up some honey-do items on our own house for one. 
(Like hanging that dining room chandelier, J.  *hint hint*)

One of the things that took a back seat last year was my seed saving.  The drought decimated our garden, but I was able to save a few seeds for this year and they've been sitting patiently on a paper plate in our guest bathroom ever since.  Why our bathroom?  That's a darn good question.  But now they need a new home.
 
I've had this crazy idea about making my own custom seed packets for awhile now.  I was able to  pick up some cute scrapbooking paper at JoAnn's a couple of weeks ago for about 15 cents a piece and, when we ended up off work earlier this week because of snow, it seemed like an easy project that I could get off my to-do list.
 
The paper was bigger than a normal sheet of paper, which means I couldn't run it through my laser printer.  So the first thing I had to do was cut it down to size.  You could use a paper cutter, but I just used a pair of scissors and a sheet of printer paper for the template.  TIP:  The one thing I learned was that I couldn't use the cardstock paper because it was too thick to go through the printer.
 
Next, come up with your template for your seed packets.  There are tons of these out on the Internet, so I just did a Google search but you could design your own with Adobe Photoshop, Publisher, Paint, etc.  Hey, put your dog's picture on there.  Whatever!  This is your opportunity to be really creative!


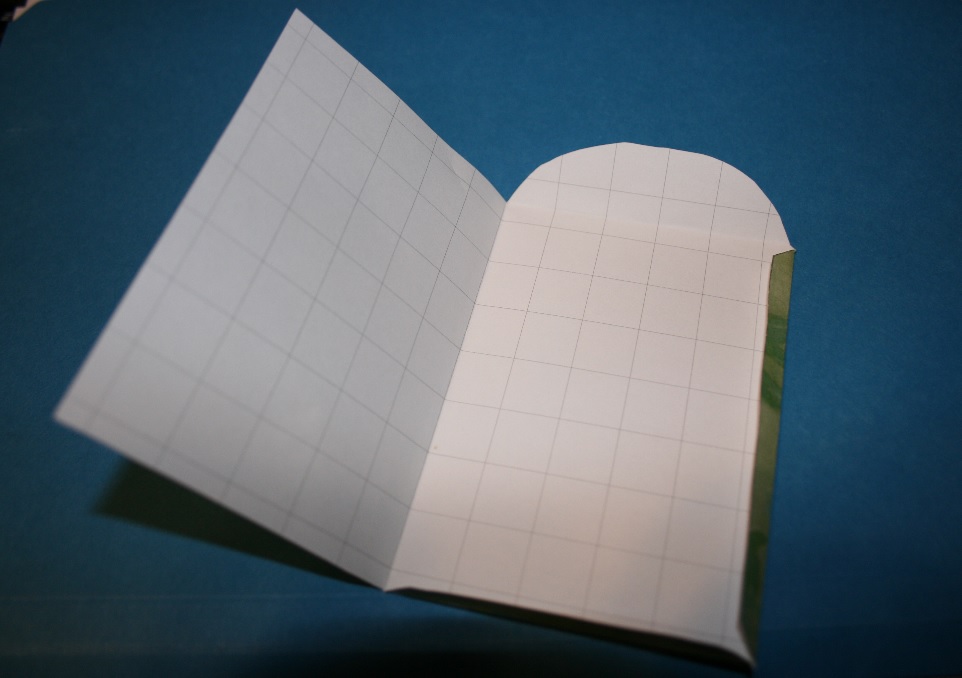
I was able to get 2 packets per sheet.  Notice the light grey lines that indicate where the packets should be cut out and folded.


Cut out the packets on the outside lines and then fold on the inside lines.  To finish the packet, use some non-toxic glue on the small folds (the bottom and right hand side of the packet in the picture above.) Don't glue the top!  :-)


I could have printed the type of seeds on these packets, but I wanted to be able to use them as I needed them.  So I just used a marker to write it on the front and added some information on the back of the packet for the date it was collected, planting information, etc.
 
They're cute, aren't they?  I realize that this is kind of a frivolous project because seeds don't need fancy storage packets.  But they Spring-y paper makes me smile, they're pretty, and I had fun doing it.  Honestly, once I had the template finished, it only took about 2 minutes per packet to print, cut and assemble each one.
 
Honestly, what started this whole idea was this beautiful box that I found at JoAnn's.  With a coupon, I got it for $6.00 and it's roomy enough to store a ton of seeds.  I could have used a shoe box but this is much prettier.  That sweet little yellow Goldfinch was too adorable to resist.  That's my story and I'm sticking to it.


Well, I've got all my seeds snug in their new packets and one thing crossed off my organization list.  Have you come up with any creative ideas for storing seeds?  I've love to hear about them.

 
I'm sharing this post as part of this week's Farm Girl Blog FestOle' Saturday Homesteading Trading Post, Clever Chicks and HomeStead Barn Hop hops. Go check it out!

Repurposing an Old Pillow

Monday, February 11, 2013

My cheapo bed pillow went flat and it just couldn't be coaxed back into fluffiness on matter what I tried.  Time to replace it, I guess.  But what to do with the old one?  I just couldn't bring myself to put it in the trash, given that we're trying to recycle and repurpose as much as we can.
 
Enter the doggie bed in our office.


The dogs had worn the padding down to nothing in the bottom. Given that our spoiled pooches' favorite place to lay down is on top of 4 pillows on the sofa, I realized that this was a great place to use that old pillow.  Especially since new dog beds like this are more than $30!
 
So I tacked the corners of the pillow back to make it more round and fit in the dog bed.  Then I covered it with $3.80 in matching fleece and added a zipper so that I could easily wash everything. 


This was my first zipper and it's not perfect, but I think I did a pretty good job. I'm sure the dogs won't mind.  This was a really easy project that took me less than an hour while I was sitting and watching The Walking Dead last night.


And here's a happy customer trying it out for the first time.


What have you done lately to recycle or repurpose?  I'd love to read about it in the comments or send me an email if you'd like to do a guest post.  Have a great day!


This post is shared as part of this week's Clever ChicksShow and Tell Saturday, Homestead Barn Hop and Mop It Up Monday blog hops.

Creative Ideas for Labelling

Sunday, June 24, 2012


If you've been buzzing around here this week, you know that I made jam out of 4 lbs of the most delicious-looking strawberries I think I've ever seen.  Whether frozen or preserved, strawberries don't seem to last very long around here.  But I've had some friends and neighbors drooling on my foot when I told them what we were doing, and that got me to thinking about giving some of it as gifts.

But I hate just handing someone a plain ol' canning jar.  So I thought I would have some fun with it today and make my own labels.  Might as well be somewhat productive since it's 95 degrees outside with 3000% humidity.  All of this took me about 10 minutes total.  First, let's start with the labels:


How do you like those names for the jams? 

(Okay....there are some inside jokes there that I need to let you in on.  Our youngest dog, Domino, likes to "woo hoo".  When you say those words, he starts running back and forth down the hallway, up onto the furniture, and generally going nuts.  I picked "Sneak-A-Lick" because that's what our dogs are always trying to do when we're not looking.  And "Ornery Streak" because Domino has a white streak of fur on the top of his head and we refer to it as his ornery streak.  He is one cute little brat, that's for sure.)

Now...before you think I'm a creative supergenius.  I happened to run across a site called the Jam Labelizer, which has these designs and allows you to change the colors and wording.  So you can make these also!

Step 1.  So the first thing I did was print out the labels with my color inkjet printer.  These would look great with a color laser but mine shot craps.  I played around with the sizing and printed a couple of different sizes so that I could use the bigger size as template for some card stock and then use the smaller one as the actual label.


Step 2.  Use stencil adhesive to attach the bigger size label to some card stock (I used red since it complimented the label color). I had this card stock already, but a full sheet is just 40 cents at Hobby Lobby. 

Step 3.  If you want, you can also use a different design paper on the back.  I chose to use the red and cream design above and decided to make it the same size as the label.  Looking at it now, I wish I had made it the same size as the cardstock.  Use regular adhesive to afix the paper to the back of the card stock (the side that doesn't have the label.)

Step 4.  Carefully cut around the outside of the jam label.

Step 5. Remove the label from the cardstock. This is where using stencil adhesive comes in handy, because it will peel away very easily and not leave any sticky residue behind.

Step 6. Carefully cut around the outside of the smaller jam label.

Step 7. Using spray adhesive, afix the smaller jam label to the front of the card stock.

Voila!  Here's how it looks....


Step 8.  Use a hole punch to put a hole in the top of the label.

Step 9.  Cut a circle of fabric approximately 8 to 9 inches in diameter.  Again, here's your opportunity to be creative.  I tried felt (25 cents at the craft store), cheap muslin, and a bandana (99 cents at the craft store). 

Step 10.  Place the fabric circle on top of the jar and use a rubber band to hold the fabric down.  I can never find a rubber band when I need one, so I had to skip this step.

Step 11.  Use string, yarn, raffia or decorative ribbon to affix the fabric on top of the jar.  I tied mine in a knot and then threaded one end of it through the hole in the label.  Then I just tied a pretty bow.

Felt looks okay..but not my favorite.   I can't believe this took just 10 minutes to put together.
 
The bandana is my favorite!  I think it really dresses it up.  But I think it would look better with a cream ribbon now.

Other Ideas:
  • Place the fabric under the canning ring.  I think there are white rings, but I've never been able tind them.
  • Leave the date off the label and laminate them.  That way they can be used over and over again and you can just write the date they were preserved on the label with an erasable pen. 
  • Print these on label paper and stick them on the jar or the canning lid.  (Personally, I would do the lid.  I hate trying to get labels off the jars when you wash them!)
  • Use old dish towels for the fabric.  A white towel with red stripes would have looked awesome.
  • Personalize the labels with stickers, metallic writing, stamps or other crafts.
  • Come up with your own design  The possibilities for creativity are endless!

Well, I enjoyed sharing this with you as much as I enjoyed making them.  I love seeing what other people are doing, so if you've got some ideas for creative labelling or dressing up your canning jars, I'd love to hear about it.  Please leave me a comment!


Related Posts Plugin for WordPress, Blogger...