Welcome to Cranky Puppy Farm!

This blog belongs to two Gen X-er's smackdab in downtown Kansas City where we've been renovating and decorating two old Victorians built in the 1890's. Our life is filled with 3 demanding Pomeranians (1 of them cranky, of course), honking cars, noisy neighbors and the hustle and bustle of city life but we dream of the day when we can move to our 40-acre farm and hear nothing but the wind and the cows next door. Until then, we're chronicling our triumphs and mishaps here as we try to garden and preserve on 2 city lots, raise chickens, and learn all those things we should have learned from our grandparents. Welcome to our world - we hope you'll stay awhile!

Showing posts with label quilting. Show all posts

"Quilt As You Go" Quilt

Monday, August 27, 2012

Yesterday was absolutely brutal! J. and I painted the ceilings in 7 rooms and the walls in 5 of them. By the time we finished with the 5th room, our shoulders were screaming, my hands were hurting and I was waving the white flag. We'll have to do the cutting in and second coats later this week. I REALLY wanted to have it painted so that we can get the carpet installers in for the new carpet. Dang, I can't wait to get that house sold.

Who knew that painting 10 foot ceilings was such hard work!? Or maybe we're just getting old. Or both. ;-)

After taking some ibuprofen and umcramping my hands, I wanted to get started on machine quilting for the first time. I'm testing it out on this quilt that we're making in class since I'm sure it will be a learning experience for me and less than perfect. We're three weeks into the class with the last class this Thursday, so I need to catch you up on where I am so far.

The class teaches the "quilt as you go" method - basically, you cut the backing, batting and top pieces and then sew them together all at the same time. Here's how:

How-To: Quilt-As-You-Go Quilt

Cutting the Fabric
  1. Cut a piece of backing fabric 37" x 37".  I recommend a non-directional fabric for this, since each block is turned 90 degrees from the last. 
  2. Cut a piece of batting 35" x 35". I used fusible to make this easier.
  3. Cut 5 pieces of fabric for your top pieces. These will be 8" x 37". I used 5 distinctly different fabrics and then left them the width of fabric. You can always trim them to length later.
  4. Repeat these steps 3 more times so that you have 4 sets.
One of my four blocks

Assembling the Four Blocks
  1. Place the batting on the backing fabric, ensuring that it is 1" in from the edge of the backing fabric. If necessary, trim to fit.
  2. Lay out the strips of your 5 top fabrics and determine the order that you like them in.  All 4 blocks should follow the same order.  Since we're turning the blocks 90 degrees each time, the first fabric will form a cross in the center.  I recommend laying out the entire quilt so that you can see what it will look like before it's sewn together and it's too late to make a design change.
  3. Place the first fabric strip right side up on the batting and line up the outside edge with the edge of the backing fabric.  Pin on the outside edge to keep it in place.  Since I used fusible batting, I also ironed it.  That sucker wasn't going to move!
  4. Place the second fabric upside down on top of the first fabric, lining up the inside edges.
  5. Sew the two together along this edge, leaving a 1/4" seam allowance.
  6. Flip the second fabric over the seam and iron.  Again, this is where fusible batting comes in handy.
  7. Repeat for all 5 fabrics.
  8. Pin the last fabric down at the edge.

Repeat these steps until all four blocks are assembled.

Quilt Now, Not Later

Obviously, we don't have a finished quilt yet.  These blocks are already quilted but, if you want to, this is the ideal time to do some fun stitching before you assemble the blocks together.  And this is where the quilt-as-you-go-method really has an advantage:  since there's no top stitching in putting it together, your quilting stitching can be the star of the show.


My yellow fabric has dragonflies on it, so I thought it would be fun to do a huge dragonfly design on the top.  JoAnn's just happened to have a continuous line stencil with 3" dragonflies but it would have been way too busy and WAYYYYYY too much sewing.  So I traced the stencil onto a piece of paper, scanned it in, and then used Microsoft Publisher to enlarge it to 28" x 36".  Why those dimensions?  Because I'm going to do a different quilting pattern in the shape of a vine with leaves on my first fabric.  And just a note here....Publisher is awesome for doing all of this.

Position the template, pin it in place and start sewing on the lines. 
When you finish in Publisher, it prints the larger pattern on 8.5" x 11" pages and you have to assemble them.  I just taped them together.  This is just large enough to to be hard to work with.  :-)  I then took Reynolds freezer paper, placed it on the printed paper, and re-drew the stencil onto the freezer paper.  Finally, I positioned the freezer paper onto the top of the quilt block and started sewing. 

TIP:  Have fun with this!  Try using variegated or different color threads for your top stitching.  In my case, I'm using my regular pink thread in the bobbin so that it matches the original quilting on the back.  But, on the top, I'm using white and pink variegated thread on the dragonflies.  And I'm seriously considering using lime green on the vine\leaf pattern.

You just sew along on the stencil line at this point.  Use a short stitch and it will perforate the paper so that the freezer paper just tears off when you're done.  This was a tip from my instructor and, while I didn't think it would come off easily....it does!

Just tear the paper off when you're done!
I'll be quilting for awhile but next time, we'll look at how to assemble the blocks together and bind the edge.

Til later!


I've shared this post as part of this week's Barn Hop.  I hope you'll go check out what other folks are up to over there!

A Pink Nightmare

Thursday, August 09, 2012


If you've seen the movie "A Christmas Story" (who hasn't?!), then you know exactly the scene that the title invokes.  Poor little Ralphie is standing there in a full-body pink bunny suit complete with ears and a tail.  His aunt has made it for him for Christmas so his mother doesn't want him to take if off because it's so cute.  She only relents when his father says he looks like a deranged easter bunny and a pink nightmare.

On Christmas Eve, TBS plays that movie for 24 hours.  I've watched it so much over the years that I can literally recite every single line.  You might get the idea that I like it *just a little bit*.

But the reason I'm channeling A Christmas Story last night is because of quilting.  I started my new quilting class last night and, after having picked out some perfectly suitable fabrics in beautiful blues, I walked into JoAnns and saw this fabric with huge pink flowers in a sea of pastel greens and yellows.  And that's when something in my brain said "Hey, that would be really cool!"

Those of you who know me well know that I am NOT a pink girl.  I'm much too conservative.  In fact, I don't own one thing that is pink or any bright color. The majority of my closet is black, followed by navy, followed by white.  Pastels?  Oh, heck no.

So did I hit my head on the way into the store?

Have I been brainwashed by watching too many design shows on HGTV?

Is it something more sinister than that?!


Not only did I buy that fabric, but I proceeded to buy all the coordinating fabric that I would need for the class.  The one on the left is the backing fabric.

This class covers a method called quilt as you go, which is kind of interesting.  You actually cut the batting and the backing and sew everything together at once.  The thread only shows on the back of the quilt and not the top, so you have to pick thread that matches your backing fabric.  (And, yes, I picked PINK!)
I'll describe it later once I get started.  But it's relatively simple - four blocks of 5 strips of fabric cut 8 inches wide by the width of the fabric. 

Since it's such an easy quilt to sew, I'm hoping to use it to practice my freearm quilting. With not having any stitching already on the front of the quilt, it will be fun to use some variegated thread to do some decorative stitching on top.

And, if I screw up...oh, well, it's pink!  :-)


A Different Kind of Quilt

Monday, August 06, 2012

Have you ever been driving through the country and come across a barn with a quilt pattern painted on it?  They are rare, although there are several here in mid-Missouri and they seem to be making a comeback in popularity. 

To me, they are a part of my childhood memory.  For my 6th birthday, my grandfather bought me a dappled pony named Charlie - a precocious little guy that loved to eat apples out of my hand.  Charlie couldn't live in town with us, so he had to stay at a family friend's farm and we'd visit him every weekend.  Atop the entrance to the barn that Charlie called home was a quilt block that I had helped paint after we helped our friends build their log cabin on the property.  To do this day, I think that was one of the best summers E-V-E-R.

Interestingly enough, barn quilts have been around for a loooooonnnnnng time.  They're thought to have been started in Pennsylvania by immigrants from Europe over 300 years ago.  Paint was expensive then, so a smaller decorative painting was a cheaper way to decorate and it provided a great way to help travelers find certain families or businesses.  In the mid 1800's, when paint became commercialized and less costly, barn painting and decorating actually became a career for many folks.  These artists started using folk designs and geometric patterns and many borrowed from traditional quilt patterns.  The barn quilt was born!  And it's been dotting  the American landscape ever since.

Now our little 10' x 12' barn is no match for those full-sized barns dotting the countryside, but that doesn't mean that it still can't be styling, right?  So I decided I would spend the beautiful afternoon yesterday painting my own scaled-down version of a barn quilt for Cranky Puppy Farm.


Supplies

Let's start with materials.  If you'd like to make your own barn quilt, you'll need the following:

  • Your block pattern (I printed mine on my inkjet)
  • A piece of plywood or something to paint your quilt on.  We didn't have any leftover plywood, so I picked up a 2' x 2' piece of 3/4" plywood from Lowes.  Cost: around $12.00.  If you don't have plywood, you could use repurposed 1x's or pallet wood.  Just make sure that whatever you choose is suitable for outdoor use.
  • Painters tape or Frog tape
  • Ruler
  • Exterior primer
  • Exterior paint in the colors of your choice
  • Exterior polyurethane or spar varnish
  • Paintbrushes

Did you know there are a dizzying array of quilt block patterns?  If you don't believe me, try putting "quilt pattern" into Google images.   I wanted to find something I could use at least 4 different colors on, but not too fussy since it would be small, but also not too easy or plain-looking.  I settled on a pinwheel within a star with blocks on the four corners.  I'm sure this pattern has a name, but I wasn't able to find it.  (Anybody know?)

Step 1. Draw out the pattern.

My pattern consisted of 8 x 8 mini-blocks.  Since my plywood is 2 ft. square, this translates into 3" squares.  After I primed the plywood with two coats, the first thing I did was to draw out the grid.  Using the ruler, I then drew out the rest of the pattern.

Step 2. Use tape to mask off the first color.

Now you have a choice as to which color you want to start with.  I decided to start with the color that had the most area on the pattern.  The next step is to then outline that area with blue painter's tape.  Since the lines are on the plywood, it's easy to figure out where the tape goes.

TIP #1:  Now that I'm done, I'd actually recommend Frog Tape instead of blue painter's tape.  It seems to seal better so you don't get paint bleeding under the edges.  Mine wasn't bad, but I did have a couple of places that I had to go back and touch up with a fine tip paint brush. If you've got fine points in your pattern (as with my star and pinwheel above), it might be easier to mask off part of it, paint, then mask off the rest and paint again.

Masking off the first color.
My first color was burgundy. This is the same paint color on the body of the barn and I also used it on the door to the chicken coop.  This was leftover paint so it didn't cost a thing.  We use Behr Ultra for all our exterior painting, which is both primer and paint all-in-one.

Tip #2: Watch for mistinted "oops" paint at the hardware store and get it cheap.  In this case, Ace Hardware was giving away free quarts of paint on Saturday to the first 40 customers, so J. and I each snagged a quart. I didn't have to buy any paint for this project!


The pinwheel in the center was tricky, so I actually painted it in two steps (I'm getting ready to do that in the picture above.)  It took 3 coats to get good coverage, since I was going over a light background.

At this point, I have a couple of tips for you:

TIP #3:  Paint at least 2 coats of each color, painting one direction the first time and the opposite direction the second time.  This will ensure you have even coverage.

TIP #4:  Do you know to keep the paint from bleeding under the tape?  Start your brush on top of the tape and then brush onto the area to be painted.  If you do the opposite, you're brushing the paint against the tape edge and it's more likely to bleed.

Tip #5: Pull the tape off once you get the second coat on there.  It will be less likely to pull paint off with the tape if you pull the tape off when the paint is still wet.

Step 3. Remove the tape and let dry.  The repeat step 2 for the other colors.

Once you get one color done, move on to masking and painting the next color.  I was painting on a hot summer day, so it didn't take long for each coat to dry and I finished this in a day.  If you rush it too much, putting tape on top of fresh paint could pull it off, so be patient!

Here's the finished product.  Well, almost.....

Burgundy represents the barn, green for the garden, and yellow for the sunshine.

 I think I'm going to change one thing on this barn quilt before I'm finished.  The white doesn't stand out enough in the center pinwheel, so I think I'm going to outline the outside edges of the white with a thin burgundy line.  It won't take long to do that at all.

Even though I primed and painted the edges of this plywood, I still don't trust it to be exposed to the weather.  I'm going to let the paint dry and then go over the top of the whole thing with some clear exterior polyurethane.  Then the next step will be put a frame around the edges with some simple 1" x 2" pine.   With J.'s help, it will be gracing the barn wall later this week.   I promise some before and after pictures so you can see it on the barn.

What have you been up to?


Chubby Chicks: Part I

Wednesday, July 18, 2012


Well, if my posting has been a little sparse, it's because I've come down an old-fashioned summer cold.  Or something that makes you lose your voice and have a non-stop headache.  As if that wasn't bad enough, yesterday I had an awful stomache ache also.  Gak! 

So I didn't get much done and never did make it to that salsa yesterday, although J. prepped about half of the tomatoes.  He'll need to pick up some jalapenos from the store tonight because we just don't have enough.  Darn rabbits ate all the leaves off our jalapeno plants!

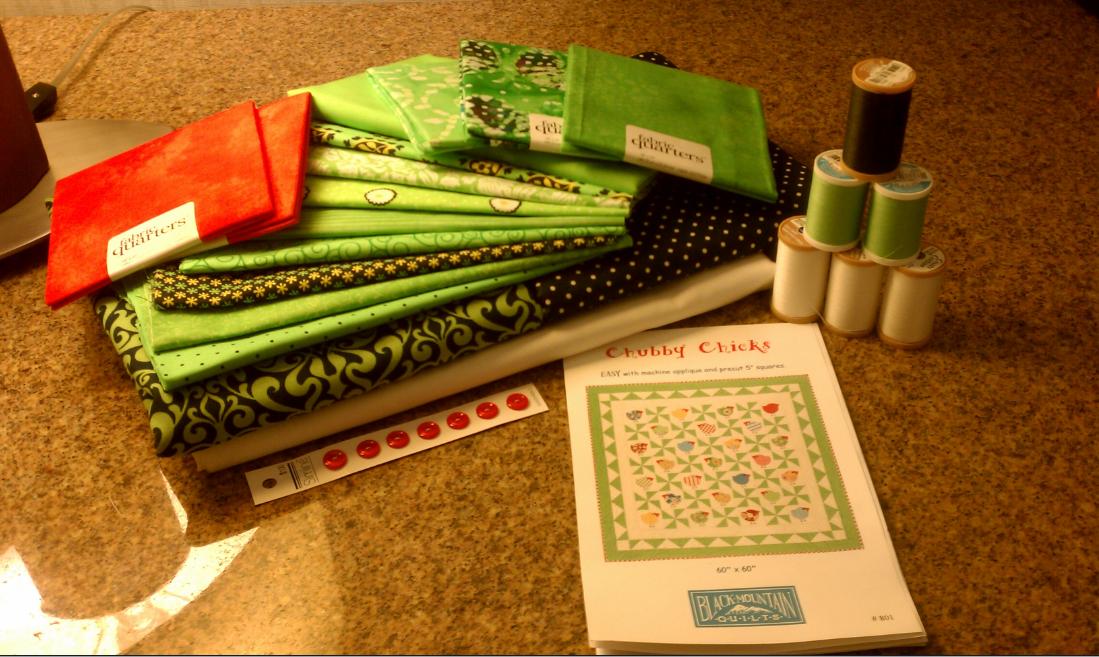
But, as you can see, I did get a little bit done at that Chubby Chick quilt.  I'd like to have it done before I start my intermediate quilting class on August 8th.  I got everything cut out today, so everything you see in the picture represents the components of the quilt with the exception of the backing and binding.  Here's a version of the finished quilt for reference.  I decided to do mine in a combination of navy and lime green fabrics. 

Yesterday, I cut out the following:
  • 25 squares of white\light fabric for the chick backgrounds, 6.5" x 6.5"
  • 4 squares of white\light fabric, 3.5" x 3.5"
  • 48 squares of white\light fabric, 3 7/8" x 3 7/8"
  • 32 rectangles of white\light fabric, 3.5" x 6.5"
  • 5 strips for of white\light fabric for inner border, 3.5" x width of fabric
  • 25 scraps of different lime green fabrics for the chicks themselves
  • 64 squares of green\blue fabric for the flying geese in the border, 3.5" x 3.5"
  • 48 squares of navy polka dot fabric for the pinwheels between the chick blocks, 3 7/8" x 3 7/8"
  • 6 strips of lime green fabric for outer border, 3.5" x width of fabric
This finished quilt is small at just 60" x 60" and consists of 25 chick blocks (16 facinng right and 9 facing left). The pattern comes with templates for the chicks and their beaks, as well as a tracer template for the feet and eyes.  I used fusible webbing to attach the body of the chicks and their beaks to the ivory background fabric and then traced on their feet.

Since we're making pinwheels and flying geese for this project, the easiest way to do this is to start with a diagonal line on the wrong side of the fabric.  So I did alot of line drawing on the back of both the white and blue\green squares:


Now I'm all set to start sewing.  The next step is to use the machine to finish the applique with a blanket stitch around the chicks (in lime green) and around the beaks (in orange).  This will be a learning experience for me, since I've never done applique before.  There will be lots of practicing!

And, finally, I'll use a tight zigzag stitch to embroider their feet (also in orange).

Anybody got any tips for a beginner at machine applique?  I'll admit, I'm kind of intimidated by it and afraid I'll mess it up. 

As I'm writing this, I see that we might hit as high as 109 degrees this weekend.  I guess I'll have plenty of time inside to work on this quilt.

Stay cool, my friends!

I've shared this with with Get Your Craft On Tuesday.  There are some really creative entries over there.  Go check it out!

A Little of This, A Little of That

Sunday, July 15, 2012

My, what a week this has been!  We finally got a break in the heat mid-week only to have the mercury head higher into triple digts again this weekend, and the humidity was back with a vengeance this morning.  

The garden is going nuts and we're swimming in tomatoes now.  J. finally got to sink his teeth into those Cherokee Purples even though they were struck with fungus and he was only able to eat 1/2 of each tomato.  After tasting them, he said we definitely need to try to grow them again next year because they are slightly sweet and oh-so-yummy.  Note to self.

I've gotta make that squash this week!

We picked up the most amazing sweet corn from a local farmer who had setup an "honor stand" stand at the end of his driveway.  If you're not familiar with the concept, an honor stand is one where you take what you want and then leave the money.  You know,...it's the honor system!


The mainstay here in the Midwest is a variety of corn called "Peaches and Cream" or "Andy's Candy".  As you can see, it's white and yellow variegated and has a nice, slightly sweet taste with kernels that are firm.  Delicious stuff but they tend to get stuck in your teeth.  The corn that we bought is called "Gotta Have It" and I can tell you that Andy ain't gonna push his candy on me anymore!  "Gotta Have It" is so tender that it gives away in your mouth, but it has all the taste of Andy's Candy.  Mmmmmmmm.....

Let's see.  I tried to reintegrate poor Henrietta, the hen that was being picked on by the rest of the flock back in March.  The wound on her neck has been healed now for some time but now the feathesr on her neck stick out rather than laying down flat.  As a result, we've taken to referring to her as our punk rock chicken.  Since she was pecked, she's been living in a separate chicken condo made  out of a doghouse on stilts (you can see a picture here).  I thought I could sneak her in right before everyone settled down for the night, and that seemed to go well.  But, when I got home from work the next day, she was hiding in the nesting boxes and it was obvious that she was being victimized again. 

So....what to do with poor 'Etta?  She doesn't lay eggs so I suppose most folks might turn her into dinner.  I can't bring myself to even think about that, because she really had endeared herself to us by following us around and "talking" to us.  *sigh*  We could give her away, but she would have to be a pet because I wouldn't give her away so that someone else could eat her (see above).  I guess she will stay where she is for now until we figure something out.

Speaking of chickens, the girls have slowed down in egg production significantly due to molting and the high heat.  Right now, I'm getting just 3 or 4 eggs a day out of the 9 chooks.  I used to get twice that.  And they are eating like a bunch of feathered pigs!

Finally, I am back to work on the "Chubby Chicks" quilt that I started back in April. 


 Some of you may have guessed that since I wrote yesterday about haunting the local quilt shops.  And I signed up for a 4-session intermediate quilting class at JoAnn's in August.  It's going to cover binding and machine quilting and I got signed up for 1/2 price, so I guess you can't swing a cat at that.  My first quilt still isn't quilted because I haven't found the right person to do it.  I'm thinking I can learn in this class and then  maybe do it myself?

Well, I'm off to bed where I'm sure I'll dream of lime green chickies and baby rabbits peeking out of my strawberry bed.  Oh yeah...I forgot that, didn't I?  There were 8 rabbit kits that hopped in all directions when J. watered the strawberry plants this morning.  At least they're cuter than squash bugs.

Sweet dreams,


Chubby Chicks

Tuesday, April 24, 2012

Okay, call me a homebody but I didn't make it out to see the city last night.  I was wiped!  After class, I grabbed some to-go food and headed back to the hotel to relax.  The great thing about driving here rather than flying is that I could bring along some stuff that you normally wouldn't want to stuff in the overhead bin.  Like my sewing machine!

My hotel room was so dark that the fabrics looks black, but they're actually a fabulous navy blue.

And here's a closeup of the pattern that I'll be following.  Those adorable little chicks are appliqued on, so I'll be learning how to do that for the first time.  I think it should be easy enough.


I spent the evening cutting fabric and ironing the patterns onto the fabric.  Then I realized that I only had my quilting foot on the machine, so I couldn't get started sewing.  Drat! 

Tonight, I PROMISE I will head out and see some of Indianapolis and come back with pics for you.  It really is a cool downtown and I can see what Kansas City aspires to.  Apparently, Indy used to look just like KC until they underwent a downtown renovation for the Pan Am games and the Superbowl.  There is so much to do here and I have just one choice for dinner, so it's going to be fun seeing where I end up tonight!

Hope everyone has a great Tuesday!

Quilt is Finished!

Wednesday, April 18, 2012

Whew!  It's finally done!


What an incredible feeling of achievement I have right now.  It's hard to believe that I started this project almost 2 months ago.  As usual, I got a little impatient to see the finished product and I'm actually done with 2 quilting classes left.  I talked to the instructor and she's going to get me started on a cute little quilt kit that I found at a local quilt ship.  It involves applique, which I've never done so I'd like to practice while I have some professional help. 

But....for those of you who are following along, here are the last steps in finishing this quilt:

Hopefully, you have all the strips pieced together after our last post and you're now ready for the two borders.  I put both of these on in just a couple of hours, so you're very close to being done. 

Cut the Inner Border
Cut 9 strips of fabric for the thin inner border that are 1.5" x WOF (width of fabric).  I used a gold color that complemented the other colors in the quilt top.

Cut the Outer Border
Cut 9 strips of fabric for the larger outer border that are 6" x WOF.  For this one, I went with this silly, fun little swirl pattern that doesn't appear anywhere in the quilt top.  Hey, it's your quilt - you can do whatever you want!


Attach the Borders
  1. Sew the strips for the inner border together with a straight seam to create one long strip.
  2. Measure the length of the quilt on the longest side. 
  3. Cut a piece from the inner border that is the same length and sew it on.
  4. Repeat for the other longest side of the quilt.
  5. Measure the length of the quilt on the shortest side from the outside of both of the attached inner borders.
  6. Cut a piece of the inner border that is the same length and sew it on.
  7. Repeat for the other short side.
  8. Follow these same instructions to attach the outer border.
  9. Press all seams.


I've already got the batting and the backing, which is extra wide black fabric (no pattern).  The ladies in my quilting class know a gentleman who does beautiful machine quilting work with a long-arm quilter, so I'll be hitting them up for his information.  I can't wait to get this quilted and see how it turns out.

If you're a quilter, can you give me any tips on what kind of quilting design might look good on this one?

Thanks for stopping by and I hope you have a beautiful day!

Quilt Step 4: Strips and Triangles

Thursday, March 29, 2012

With a hiatus in there for Spring break, it's been awhile since I posted about progress on the quilt.  When we last looked at this project, I was piecing together the 32 squares that make up the quilt.  I've spent the past couple of weeks figuring out what fabrics go where in the quilt and then sewing the squares together.  I found it really helpful to lay everything out on the bed so that I can see what it would look like when it was finished.

For those of you that are following along, we're close to starting to put this quilt together.  There's just a few remaining pieces that we need to cut out- the triangles.  If you remember, the quilt is en pointe, so there are triangles around the outside to make it square as shown in green

Start by cutting out four 18.5" x 18.5" squares. Then cut them into quarters diagonally.  You'll end up with 16 triangles that will be used for the triangles that are NOT on the 4 corners.

Then cut out two 9.5" x 9.5" squares and cut each one in half diagonally just once.  You'll then have 4 triangles that will be used for the 4 corners.


Use the guidelines on your cutting board to keep the fabric straight.  On the larger 18.5" square, it may be easier to double the fabric over when you cut it to 18.5" and then double it over the other direction to cut the other 18.5" length.

We're now ready to start piecing the quilt top together.  This quilt is made up of 8 rows of squares and triangles:

The yellow lines designate the rows in our pattern.

Start the first row by sewing one of the smaller corner triangles to the top of the first block.  Then a larger triangle is sewn to either side of this block.  Center the triangles so that you have at least 1/4" seam allowance on both sides.  Repeat until all the rows are completed.

Then, when the rows are completed, sew the rows together to form the quilt top.

Next week, we'll talk about cutting and attaching the inner and outer borders to our quilt.

Happy quilting!


Quilt Step 3: Piecing Squares

Friday, March 09, 2012

Before we get started with the next stage of our Strip Around the Block quilt, I want to share with you one of the quilts that was just finished by Sue, one of the sweet ladies in my quilting class.  Isn't it beautiful?  I can only hope that my first attempt comes somewhere close to looking so good.


This was just one of the beautiful quilts that she had just received back from the machine quilter.  Looking at all her work just made me more excited about getting my first one done.  So let's get back to work!

In my last quilting post, our homework was to get all the light and dark strips sewn together in pairs, press the pairs open, and then cut them into 2.5" x 4.5" rectangles.  

We now have 8 sets of light rectangles and 12 sets of dark rectangles and we're ready to start piecing them together.

The next step is to start assembling the center of our squares.  The square are formed by taking two rectangles of the same fabric, turning one of them 180 degrees, and then sewing them together on the long edge.  We'll need a total of 20 light-colored squares and 12 dark-colored squares.  Since we don't have that many individual fabrics, you'll have multiples of some of them.  I just did one set of each color to start and then did additional sets in my favorite fabrics until I had the right number of squares put together.

As you put these together, it's really important that you pay attention to whether or not the points of the squares will line up in the middle and form a perfect "+".  If you've cut your initial fabric carefully, you can actually feel the seams lock together and the outside edges of the fabric squares will also line up perfectly.   I was REALLY careful (a.k.a. "anal retentive") about getting my cutting right, so this part was pretty easy for me.   


A pic of some of my centers put together.  The strip on the bottom is part of the next step.

Now that we have our square centers done, let's focus on the band of strips that go around them.  If you have a light-colored fabric in the center, then the band of strips will be dark-colored and vice-versa.  The top is made up of 2 rectangles sewn together lengthwise so that the fabrics alternate (as shown in the above pic).  The bottom is made in this way also.  The sides are just the plain old 2-square rectangles. 

Here's an example of a square where I've sewn the top and bottom rectangles together and I'm getting ready to sew the entire square together.


Start by sewing the two sides on the center square first.  Then sew the top strip on, followed by the bottom strip.  Rinse and repeat until all of these squares are put together. When finished, you'll have 20 squares with light fabric in the middle and 12 squares with dark fabric in the middle.  

You'll probably want to play with your fabrics to see what colors and designs go well together before you start sewing.  I needed a much bigger work surface, so I'm going to use our pool table at home for this purpose.  But you could simply lay it out on the floor if you like.  If I had done that, a certain puppy would have stolen some of my pieces!


Who?  ME?

Well, I have lots of sewing to do (as do you if you're following along!)  Next time, we'll complete the squares and then start putting everything together.  I can't wait!


Quilt Step 2: More Cutting!

Wednesday, March 07, 2012

I locked myself in the dining room last night away from the TV, dogs and nosey hubby so that I can get my homework done for quilting class this week.  In my last update on this project, I had already cut the initial fabric strips out.  They don't call it the "Strip Around the Block" pattern for no reason.  LOL.

This week's homework was to pair up 20 dark fabric strips together and 16 light fabric strips and then sew them lengthwise in pairs (dark with dark and light with light).


Finishing a strip. I've got a cotton rug under my sewing machine to protect my dining room table.

My instructor gave me a great tip during class last week.  Since I haven't sewn in awhile, I was a little worried about keeping my seams straight.  If you look closely at the picture above, you'll see a strip of what looks like cardboard in front of and slightly to the side of the foot.  It's a narrow strip cut from Dr. Scholl's moleskin padding - you know, the stuff you put on corns and bunions on your feet?  It's self-adhesive (but can be easily removed) and provides a great guide to run your fabric up against as it feeds through the machine.  I felt alot better about my first seams using this and they came out perfectly straight!  So, if you have a beginner sewer in the house, you might try this trick.


10 dark and 8 light fabric pairs sewn together
The next step is to press the seams open.  This goes pretty fast even thought I pressed the fabric front and back 3 times:  (1) set the seam as it is with the two fabric fronts facing each other, (2) then I opened up the fabric by folding one of the fabrics over the seam and pressing it (as shown below), and (3) I turned the fabric over and pressed it again just to make sure I had a clean, crisp press. 


Pressing the seams open.  This is my least favorite part of sewing - right up there with folding laundry on the list of most boring things in life.
 Finally, using the Shape Cut or a ruler, cut the strips into 2 1/2" wide rectangles (so each rectangle is 2 1/2" x 4 1/2" with the sewed seam in the middle).  We'll be using these pieces to make the center of our squares.  As you cut them, stack them by colors.  (Sorry....I didn't take a picture of this step!).   If you're making this quilt along with me, stay tuned later this week for the next steps.

Tonight, I'm starting my "Food Not Lawns" class and hope to bring back some interesting garden tips for everyone. In the meantime, I'm off to work to find out if the job offer I extended yesterday to a potential new member of our team will be accepted. 

It's 63 degrees at 7:30 this morning and it's early March.  Spring is here.  Hope you enjoy your beautiful day!

I'm SEW Excited!

Wednesday, February 29, 2012

This newbie quilter has been a busy little bee, so I thought I would update you on what I've been working on since my quilting class last Thursday night.  Our homework this week was to get all of our fabric strips cut out - these are 2.5" strips the entire width of the fabric.  It was very slow going because I only had the straight ruler, until quilter exraordinaire Helene let me borrow her Shape Cut.  Gals, if you don't have one of these, you need one!  It sped up my cutting by 3 times over at least.  Just line up the fabric and then zip, zip, zip and you're done.


On Thursday, we'll start sewing these strips together and then cutting them into 2.5" x 4.5" squares.  I still need to pair up the fabrics and decide what I want to go together, but that's the fun part.

Which brings me to why I'm so excited!  My old Brother sewing machine and I have been eyeing each other warily as the sewing date approaches.  It's about 17 years old and works just fine, but it is just a straight sewer with no bells and whistles and....well....I'm a little afraid that I'll have problems with trying to quilt with it because it's not very powerful.  I think it was a $49 jobbie from Walmart, if I remember correctly.  It's been useful, but now it's going in the yard sale because I just broke down and bought this!

The Janome DC2012

I used my Chase Amazon card points and got it for a steal!  It's ultra-lightweight and has 50 built-in stitches, including multiple button holes, serge stitches, and simulated handstitching.  The best thing about it?  Clear bobbin case and an automatic needle threader (I'm not getting any younger, you know.)  I put alot of research into a beginning machine for general sewing\quilting and kept coming back to the DC2012 because of the great reviews.  Then I asked in the quilting class and the instructor and everyone else said:  "buy a Janome".  Even the expert quilter with the Bernina said I'd be happy with it.

It just arrived last night and J. and I unpacked it.  Tonight, I'll be trying it out for the first time so that I don't look like a complete idiot in class tomorrow.  And once I've had time to work with it for awhile, I'll post a review for you.

Are you working on sewing project that you'd like to share?  Have any thoughts on the Janome or a recommendation for a product that would make sewing projects easier?  I'd love to hear from you.  Leave me a comment!


Find out what other folks are making over at this week's Country Homemaker Hop.

Strip Around the Block

Tuesday, February 21, 2012

Okay, how many of you thought about streaking in college when you read that title? C'mon...fess up!


Actually, "Strip Around the Block" is the name of the pattern that I'll be using for my first quilt: "Strip Around the Block". It looks like it's pretty easy but what do I know? I'm a newbie. At first I chickened out and planned on making the crib quilt rather than trying to tackle a queen-size but then I thought..."hey, what if this is the last one you make? Might as well make it count." As if this will be the last one. Ha! I am so hooked! And I haven't even sewn a stitch yet.

After work I headed to Hancock Fabrics to try to find a couple more light fabrics to finish out the 12 that I need for the pattern. And, in typical Cranky Puppy form, I found some other fabric that I couldn't live without.   The one on the left makes me think of vintage crocheted doilies.


More fleur de lis! As I mentioned in my earlier post, our house is full or fleur de lis so this is perfect.

And check these out with the tiny flowers and the gardening terms.


Cucurbita Maxima!  On fabric!  How can I NOT use this one?
I'm already having a really hard time deciding which fabrics to use, because I love them all. I may have to go rogue in the class and use them all.  By the way, J. thought I should use either flannel or fur.  He's such a guy.

Work was crazy today so it was great to come home to a house that smelled so yummy. J. had made homemade steak soup and it was absolutely delish.  I'm so spoiled having a man that can cook. 

I'm up way too late tonight working on this post and looking at chicken cams and old fashioned egg cartons. Time for me to hit the sack. I'll be back tomorrow to talk about seeds and garden planning.

G'night!


p.s.  Forgot to mention that I sold another dozen eggs today to my friend Karen at work.  Thanks, Karen!
Related Posts Plugin for WordPress, Blogger...