Welcome to Cranky Puppy Farm!

This blog belongs to two Gen X-er's smackdab in downtown Kansas City where we've been renovating and decorating two old Victorians built in the 1890's. Our life is filled with 3 demanding Pomeranians (1 of them cranky, of course), honking cars, noisy neighbors and the hustle and bustle of city life but we dream of the day when we can move to our 40-acre farm and hear nothing but the wind and the cows next door. Until then, we're chronicling our triumphs and mishaps here as we try to garden and preserve on 2 city lots, raise chickens, and learn all those things we should have learned from our grandparents. Welcome to our world - we hope you'll stay awhile!

Solar: Wiring Inside the House

Saturday, September 20, 2014

 
7 hours of hard work between Tony and J. and the wiring inside the house is all done and up to NEC 2011 electrical code. 

I want to give a shout out to Tony for all the help he has given us.  I wanted to give him some free advertising, but he just informed me this afternoon as he was leaving that he's giving up his own business because he "can't make a living at it with all the taxes, healthcare, etc.".   Politics aside, that's a damn shame. Luckily, he's landed a really good job and will be taken care of.

Again, if you are thinking about doing a solar project, I highly recommend finding an electrician that has done it before and is willing to work with you on a consulting basis. 

Solar: Mounting the Inverters

Friday, September 19, 2014

Tomorrow, Tony, our Master-Electrician-on-retainer will be here to help us do the final wiring in the house so that we can get it inspected next week before J. leaves for a conference in Kentucky on Tuesday.

So we had some prep to do before Tony gets here.  Perhaps the biggest thing on the list was clearing out the space in the basement where the inverters are going.  We'd been storing tools in that room, so they all had to be relocated.  Then we had to run some 2x4's from floor to ceiling where they screwed into the joists and then a leftover piece of plywood from the laundry room reno is what our two SolarEdge SE6000-US inverters are mounted to.

Installation requirements are that the two inverters have to be mounted at a minimum of 4 inches apart so any heat can dissipate.  As you can see in the picture, we have plenty of room so there will be a "combiner box" between the two inverters where the output wires from the inverters join together and then run to the main panel. 

My back is STILL screwed up, so J. did all of this by himself tonight while I sat on the couch with the dogs and watched reruns of Renovation Realities.  I would rather have been helping than dealing with this back pain.  It's really starting to get old.

Solar: Pulling Wire Through Conduit

Thursday, September 18, 2014


After our defeat last night at the hands of some stubborn wire, we decided to bring out some bigger guns.  Not only did J. pick up some wire lubricant to make those wires slide through the conduit more easily, but he also snagged a chain hoist from Harbor Freight.  Rather than break our backs, we'll let a tool do the hard work!

The deck is right above where we're pulling the wire, so he attached the hoist to the underside of the desk.  You can see that in the pictures above.  The green rope is what we are pulling through the conduit, and the wires are attached to the end of that rope.

With me lubing the wires and feeding them, and J. pulling on the other end, the wires were going through slowly.  Every couple of feet, J. had to stop and reposition the rope on the hoist.  We could gauge how far we were by how much rope was out of the conduit and, at about 2/3 of the way, I hear J. yell.  Running as fast as I could with this bad back, I found him lying on his back on the ground.  The rope had broken.

Fortunately, it broke outside the conduit and there was enough that we could continue to pull on.  But that could have been disastrous!  Had it broken in the conduit, we could have had to pull the wires out backwards and start all over.

Well, as you can see in that second picture, we finally have SUCCESS!  Right as it was starting to get dark, the wires emerged from the conduit.  We pulled it another 10 feet or so and called it quits for the evening.

This part of the project was pretty stressful and I think there are several lessons that we learned during this whole process.  I'd like to share them here and maybe save someone some frustration.

Lessons Learned:
  1. Always use bigger conduit than you need.  We went by the solar company's specifications but going bigger doesn't violate electrical codes.  It will only make your life easier.
  2. Minimize the number of angles.  We had some bends in the conduit and then a 90 degree long angle near the house.  The rule of thumb is that you shouldn't have more than two 90's and every bend or angle is going to make it harder to pull the wires through due to the friction.
  3. Invest in a bottle of wire lubricant and lube, lube, lube.  It's messy, but the stuff evaporates later on.
  4. Don't tape the wires together before you pull them! The tape will snag on the conduit as you pull it.
Up next for the solar project:  mounting the inverters and final wiring.  We're getting so close!


Popping a Gasket

Wednesday, September 17, 2014

Time to get back to that solar project!    Here's where we are: 

  • We've got a 109 foot piece of 1" conduit running between the solar array and the house and it's now buried as deep as 24 inches.  
  • Each string of panels will have a red (positive) and black (negative) wire that has to run back to its respective inverter.  So we need to pull 4 colored 8-gauge THWN wires through that conduit, as well as 6-gauge stranded copper ground wire.
  • Our fish tape is only 100 feet long so it's not long enough.

So how the heck do we get all that wire pulled that far?   The answer is to use a rope.

This is where having an electrician to call is useful.  Believe it or not, a Shop Vac is again the tool of choice.  Just tie a piece of plastic in the shape of a parachute and then tie that to some very light twine or string.  We tried sucking it through from one of the other and that didn't work but blowing it from one to the other worked like a charm.  I have to confess that I didn't think it would work, so color me wrong!


Once we had the string running through the conduit, we did a mini celebration dance and then taped  a heavy duty rope to it and pulled the rope through.  The wires were then attached to the rope with a liberal amount of duct tape and we pulled and we pulled and we pulled.  We nearly gave ourselves aneurysms from all the pulling. 


But I think we had gotten the wire maybe a 1/4 of the way to the house and we were stuck.  In the dark at 10 p.m. and working by flashlight amidst the mosquitoes, we finally gave up.

We are going to figure this out one way or another!  (And J. is going to take my suggestion and go get some wire lubricant tomorrow.)


"New" Old Butcherblock Countertop

Saturday, September 13, 2014


Time for confession....I have a butcher block fetish.  You know those big ol' butcher blocks on fat legs?  The ones they used to use in actual butcher shops?  I drool over them.  But they're super expensive and H.E.A.V.Y. 

I think I mentioned that we've been working on a very slow project to renovate our laundry room.  We painted and put in the new cabinets this week and now we're ready for a countertop.  There's a new Ikea opening in Kansas City next month and I was thinking about buying one of their 1.25" thick maple countertops for $170. But then I happened across a guy not far from where I work that was selling used butcher block countertops from a professional kitchen.  These babies are 2.25" think hard rock maple with knife marks, gouges and even someone's declaration of love for someone with the initials "RH".  Was it worth the extra $30 for these thicker countertops with more character?  The question didn't even need to be asked.

We dragged the 8 foot piece home (yes, it's heavy!) and into the garage where I proceeded to sand and sand and sand and sand and sand some more to get the original finish off.  I wasn't trying to get rid of the defects.  Rather, I just wanted to get it to where it might take some reddish-brown stain since the natural maple color really doesn't match anything in our house.  And, since it's going into our laundry room, putting stain and polyurethane on it is OK.  Just don't do that if you're planning to put it into a kitchen or place food on it!

We must have burned up 2 saw blades and nearly caught the thing on fire when tried to cut it to length.  Hard rock maple is just that...hard!

Anyway, I think the final result turned out pretty nice.  That's two coats of Minwax Red Mahogany and three coats of poly.  And I finally got that butcher block that I've always wanted.

Happy late birthday to me!

A Fiend In Our Midst

Saturday, September 06, 2014

I went out on the daily "check on the chickens" run this morning, only to find the signs of a massacre.  My first clue was an overabundance of flies near the door and the fact that no chickens were in the chicken run.  A peek under the coop revealed a very dead, disemboweled chicken.
 
I'll spare you the gory pictures. 
 
A quick count of the chickens revealed that a second chicken is missing and presumed killed in action.  We are now down to 5 left from our original 9. 
 
Having seen a possum the other night in my headlights when we got home, I have a sneaking suspicion that he's the fiend that perpetrated this. 
 
I can't tell you how angry, frustrated, disappointed, mad, ticked, upset...you get the idea...I was when I found this.  I've been wondering why there have been so many feathers and why they had stopped laying, thinking they are finally slowing down since they are close to 4 years old.  Seriously, it looks like a chicken exploded in the coop but, big idiot that I am, I thought they were just molting again.  If someone or something was terrorizing me at night, I guess I wouldn't feel like doing my job either!
 
My back is still screwed up to the point that I can't bend over without pain, so J. put some boards up to block anything from coming under the coop and into the chicken yard.  Let's cross our fingers that this works until we can rig up something more permanent.

Transplanting Blackberries

Tuesday, September 02, 2014

A couple of days ago, we dug the huge trench to bury the wiring from the solar array to the house.  That trench went right past the "blackberry jungle", which is the affectionate name that J. has given our backyard now that our Triple Crown blackberries are attempting to take it over.  Some of the canes on these plants were over 12 feet long and, as they outgrew our measly trellis and arched over, they dug into the ground below the raised bed and started sprouting babies. 

The trencher had to go through there, so I had about 15 or so plants that I had to evaluate for whether they should be saved or not.  We really want to move the bulk of the blackberries up to the new lots and expand the number that we have, so it makes sense that we move them.  Unfortunately, I didn't have 15 pots and couldn't save them all, but I did manage to save over half.

Unfortunately, this isn't the best time to be transplanting these beauties since it's really stinkin' hot.  I'm really worried that they wilt from the combination of distress from being dug up and the heat if I put them in direct sunlight, so they're resting in the shade of the house for now.  Cool weather can't be far off and we'll transplant them to their final resting spot on the vacant lots once it's here.

A House for $1400

Sunday, August 31, 2014

Every year, the county holds a tax sale for any properties where the owners haven't paid the property taxes for 3 years.  I've gone before to one of these sales just to see what the process was like but have never bought anything.  You have to register at least 10 days ahead of time and jump through some hoops to prove you don't have any convictions for property code violations.  Owners have up until the time their property is sold to pay the back taxes and save their property from the sale and, amazingly, there are lots of people that wait until the last minute.

The sale is held on a Monday in August (could they pick a hotter month?!) on the courthouse steps here in Kansas City.  This year's sale was this past Monday and the weather on the day of the sale didn't disappoint - the heat index was around 105 degrees.  Fortunately, the sale is on the north side of the courthouse so we were in the shade of the building all day.  But it was still hot!  The only thing that made it bearable is that some friends from the neighborhood were there trying to pick up some vacant lots to expand their urban farming operation and we ended up chatting all day while we waited for our properties to come up for sale.

J. and I like to exert our "sphere of influence" in the neighborhood right around our house, so we were looking for properties to rehab within a 5 block radius of where we live.  There were 3 properties all on the same street that caught our eye.  2 of them got saved from the sale by the owner.  But I was able to snag the last one for just $1402.01 after no one bid against me!

So here's a glimpse of our next project (at least what we can see is behind all the overgrown trees and weeds!:

The original front door is still there.
It's  a 2-story all-brick home built in the late 1800's with an extra lot on the side, which makes for a great yard.

Looks like we need to board up the back door and mow the yard.
Total square footage in this 2-story is 1922 sq ft and, according to Zillow, it has 2 bedrooms and 2 bathrooms.  I suspect there's at least 3 bedrooms in a house this big.  J. and I peeked in one of the few windows that we could see into and the house is full of trash but it looks like all the original woodwork is intact and in great shape.

I love the arched window.  Why would you cover that up!?
 The tree has wreaked havoc on this porch and the concrete porch slab has collapsed.  I suspect this isn't the original front porch anyway, since it's cinderblock.  All the woodwork on the porch is in great shape, however, so we'll tear out the concrete and cinderblock and replace it with something that would have been on the house originally. If only we knew some porch experts.  Oh wait...that's us!

But just look at the detail on this house.


We don't exactly own the house yet....we have to wait for a court hearing in December to get final approval of the sale.  The sales are rarely overturned, however, so we should own this beauty in just a few short months.  That gives us time to finish up our solar project and get mentally prepared to do another rehab.  We're going to change this neighborhood one house at a time.

A house for $1400.  Amazing, isn't it?

The Great Divide

Thursday, August 28, 2014

So where are we with the solar project?  We've had a stretch of hot, dry weather so what better time to get out and play in the dirt.  It's about 100 feet from the solar array in the backyard to our house and city code requires that the wiring be buried in 1" Schedule 40 conduit the entire way.  Normally we would only need to bury it 15", but our electrician-on-retainer told us it would need to go to 24" under where we want to pour a concrete driveway. 
 
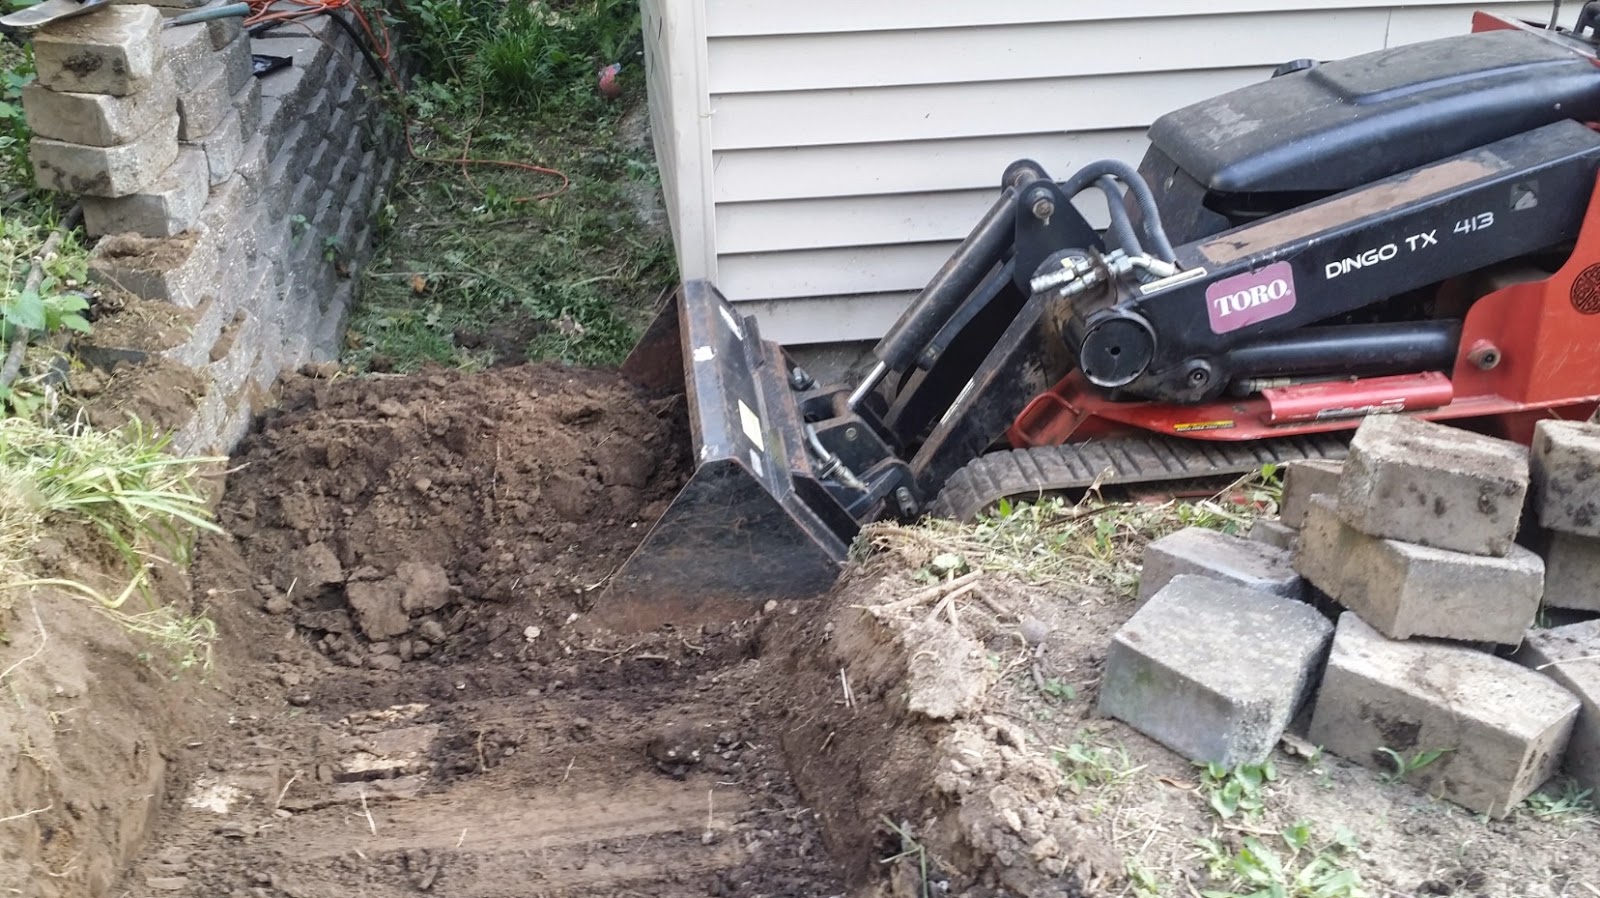
Adding to the fun was this elevation change from the backyard to behind the garage and the really tight space between the retaining wall and garage.  The Dingo has a trencher attachment and we really wanted to use it rather than digging this by hand.  Had we done that, I think the neighbors would have found both J. and I lying comatose in the back yard.  Not that we're strangers to hard work, but did I mention the heat index was over 100 degrees?  When you can guzzle water all day while you're working outside and never have to pee, you know it's hot.


Fortunately, the Dingo fit in that tiny space with just an inch on either side.  It was a tight fit!  First we had take out the retaining wall that was in the way.  Then the Dingo made short work of digging it out to 24" but we hit an old brick retaining wall AND a 6" concrete pad.  The Hilti mini-jackhammer came to the rescue.


The it was off to the races with the trencher.  The trench goes all the way to the back support for the array where we'll mount a junction box to pull all the wires together.  Then it travels across the backyard under where the new driveway will go and down behind where the retaining wall was.  Our plan is to put steps here so it's easier to get into the backyard.


And behind the garage.  This was really hard to trench, since the dirt had nowhere to go due to the tight space.  The nice thing about this part is that it was in the shade all day!
 
And, finally, behind the hot tub and air conditioner to the edge of the house.

There were lots of areas where we had to go back and clean the dirt out of the trench by hand to get it to the correct depth.  Believe it or not, a Shop Vac is the easiest way to do this unless you want to lay face down in the dirt.  I'm sure it looked funny to see us out there vacuuming - especially since it was getting dark.  But we were looking skyward and hoping it didn't rain before we could get the trench inspected.  Can you imagine the muddy mess that would make?
 
The good news is that we got it done in time to get it inspected today.  We beat the rain that's supposed to happen tomorrow.  And really good news...we passed the inspection!  After all the drama, the city inspector didn't even pull out his measuring stick to check the depth.  In fact, he spent most of the time griping about how he wants to do solar panels but his HOA won't let him.  My response?  Move!
 
Anyway, that was the green light that we needed to get everything wired up and ready to hook up to the grid.  Once everything is wired, we'll have to pass one more inspection and then we can flip the switch and turn the panels on.  Woohoo!
 
But, for now, J. and I are enjoying some much-deserved ice cream after filling that darn trench back in.  It's done....so time to finally relax.
 
This post has been shared with this week's Homestead Barn Hop.  Go check it out!

Has It Been A Month Already?

Tuesday, August 26, 2014

 
Holy cow...this month has flown by and I certainly didn't realize it had been that long since I posted on here.  As usual during the summer, life happens and there's so much going on to take my attention away that the blog has taken a back seat.  But it's time to get back in the ol' office chair and catch up with everyone and also catch you up on what we've been doing these last 30 days!
 
We've been doing some solar work and it's been slow going because my back has just not been 100% this entire time.  3 weeks ago and after 4 weeks of back pain, I put on my big girl pants and swallowed my fear of chiropractors and went to see one.  He's a "no crack" chiro and it didn't hurt at all so I'm not sure what I was scared of.  In fact, it has helped immensely and I'm proud to say that I am now mostly pain-free.  I get a tweak every once in awhile but we're still working on it.  The only bad part about it is insurance doesn't pay anything until my $2500 deductible is met but after that they pay 100%.  The office visits are $42, so it's going to take awhile to get there.  I usually pay an extra $20 and have them do an ultrasound treatment on my lower back because it feels like a massage and those tight muscles just loosen up instantly with it. 
 
Wow, I've turned into my grandmother.  I seriously didn't mean to launch into a "what ails you" discussion but that's been the biggest hurdle I've been dealing with this month.  There's nothing worse than a bad back!
 
Anyhooz....I wanted to get a post up here to let you know we're still around.  My next post will be about our new project, and then I've got pictures of the trench we're digging for the solar.  We're hoping to get that project wrapped up soon.


A Farmer's (Tall) Tale

Monday, July 28, 2014


This has been a bumper crop year for tomatoes and we almost can't keep up with our 6 plants.  I pulled 13 ripe Early Girls off of one plant Sunday night and we've given away I-dont-know-how-many to all the neighbors.  Time to make some crushed tomatoes for chili this fall?

J. has been engaged in a rather fun "tomato war" via text messages with his mom.  Or it's more a war of who can tell the tallest tale regarding how big their tomatoes are.  We've had fun coming up with some whopper stories, so why don't you join in the fun in the comments?  You know those "Your momma is so fat that..." jokes?  Well, how about this....

My tomato is SO big that....

...it wouldn't fit through the back door!

...I had to rent a Bobcat to move it!

...we fed BLTs to everyone in the tri-state area and STILL had leftovers!

I hope you'll join in the fun and add your own "whopper" tale in the comments.

And speaking of tails....it looks like we're not the only ones that like huge tomatoes.


I've shared this silliness with this week's Down Home Blog Hop and Homestead Barn Hop.  They're's lots going on over there - go check 'em out!

Thief!

Friday, July 25, 2014

EVI 001.  Photo of suspect committing berry misdemeanor

SOMEBODY has been stealing some of our blackberries and I just happened to catch the little booger in the act this evening.  This little rat-tailed squirrel came sneaking over on the top of the fence, climbed straight down and then disappeared into the blackberry canes only to reappear with a big fat blackberry in his mouth.  He then proceeded to devour the evidence right there on top of the fence while showing absolutely no guilt or remorse (or regard for any humans). A second trip yielded no more ripe berry treats, so he scampered off wit his tail a-twitchin' in frustration.  What a brat!

Blackberry Bliss

Monday, July 14, 2014

DISCLAIMER:  An addictive blackberry jam recipe can be found at the bottom of this post.  The owner of this blog can in no way be held responsible for your making and eating too much of this delicious, silky, yummy, sweet summer in a jar...

....nom nom nom...

We got our first berries of the season last Wednesday (July 9th) and have been picking them by the handfuls every evening ever since. The Triple Crowns are the giant, fat berries and the Arapahos are the smaller ones.


Sometimes they don't make it into the house. Mmmm...fresh picked blackberries are the best! 

Hey, wait a minute....I pick them and J. eats them.  Something's wrong with this picture!

But J's favorite way of eating them is to let them marinate in the frig for awhile in some milk and sugar. 


Me?  I love blackberry jam but, even though I'm picking like mad, they're disappearing and I don't think we're going to have enough to make any.  But I'm going to rectify that situation this fall because I'm rooting a whole mess of new plants that I'll be transplanting to the new lots this fall.  Did you know they're insanely easy to root?  Just bend the end of a cane over, cover it with some dirt and weight it down so it doesn't move.  The plant will root itself.  Find a friend who has blackberry plants...you'll never have to buy them!

Anyway, you know what else is easy?  Making blackberry jam.  So, even though I may not get to make any this year, I thought I would share my canning recipe with you.

~*~*~*~*~*~*~*~*~*~*~*~*~*~*~

"Summer In a Jar" Blackberry Jam (canning method)
makes 3 pint jars (or 6  8-oz jars)

Ingredients
5 cups blackberries (washed and drained)
7 cups sugar
1 teaspoon lemon juice (optional)
2 teaspoons cinnamon (optional)
1 (1 3/4 ounce) package dry pectin 

Directions
  1. Measure out the berries and then wash them to remove any debris, ants, etc.
  2. If you don't want seeds in your jam, you'll need to use seedless blackberries or de-seed them by running them from a food mill OR mashing them through a strainer into a large pot.  The seeds will stay in the strainer!
  3. If you don't de-seed them, you can mash them directly in a pot.  For this recipe, you'll want to use at least an 8 quart pot.
  4. Heat on high and add the pectin to the berries a little at a time, stirring constantly until the berries come to a full boil.
  5. Add the sugar all at once, continuing to stir until the berries return to a full boil.
  6. Boil for 1 minute.
  7. Remove from heat and skim any foam from the top, if necessary.
  8. Ladle into clean, hot pint jars, leaving 1/4 inch space at the top.
  9. Wipe the rim of the jar and put canning lids and rings on fingertip tight.
  10. Place the jars in the prepared canner (water should already be hot) and make sure the water is 1 inch above jars.
  11. Process in a boiling water bath for 10 minutes.
  12. Remove the jars and set them upright on a towel away from drafts until cool (overnight works great).
  13. (optional) Just try to keep some of this to enjoy in the dead of winter.  Seriously...just try it.  It never works here at Cranky  Puppy! 
 I've shared this post with this week's Homestead Barn Hop.  Go check it out!

A Quick Pup-date

Friday, July 11, 2014

Domino, still wearing his sporty green bandage from the vet but happy to be home!
 
Good news, good news!  First, thanks to all of you that expressed concern over Domino's recent surgery.  Everything seemed to go well and he is now resting comfortable at home with "mom and dad" where we can keep an eye on him for the next week and a half.  Keeping him inactive and from trying to jump up and down off furniture is going to be a challenge, because he loves to sit half on the back of the loveseat and half on my shoulder when I'm sitting there.
 
If it isn't one thing it's another...I pulled a muscle in my back 2 nights ago and can barely move.  Hopping into the Jeep to drive to the vet and picking the dog up and down is a challenge, to say the least.  And right before we were going to spend the weekend hoisting solar panels, too!  Poor J...he's staying home today to take care of both of us.
 
I'm trying Tylenol pain crème, heat patches, heating pad and OTC pain meds.  Anybody got a good remedy for back pain?

One Worried Puppy

Wednesday, July 09, 2014

 
Domino, our beautiful and much-loved rapscallion "puppy" (he's 8!) went to the vet yesterday and had to stay.  I am beside myself with worry, because we just learned that he has to have the same surgery that he had 4 years ago to remove stones from his bladder and urethra.  According to the vet, an x-ray shows that he has one the size of a nickel in his bladder.  Poor little guy!  He only weighs 18 pounds, so that's a pretty big stone!

Despite being on special food to prevent the stones, he's gotten them again.  The vet did warn us 4 years ago that it was a probability that it would happen, but I had my hopes up.  The $800 for the vet bills will do a number on our budget.  Some might say it's insane to spend that kind of money on a pet but look at it this way....would you spend it on your kids?  Well, he's my baby!  And the alternative is to do nothing and, well......  the outcome there is not good.

Please cross your fingers and send good mojo in Domino's direction today, if you can.  He's a scrapper and I'm sure everything will be fine, but I can't bear to think of losing my sweet pup-pup.

Blackberries Galore

Monday, June 30, 2014

The blackberries we planted a couple of years ago are going a bit nuts this year.  And, since I discovered they are now trying to climb up our neighbor's tree and across our back patio, it was time to give them a little attention this weekend.  They are LOADED with berries that are starting to turn red and ripen.


But first...gloves (watch out for poison ivy!), machete, and safari hat.  A spotted leopard darted from the thick jungle as we dove in to cut back all the overgrowth on the far end of the bed.  Okay, maybe it was really just the neighbor's cat and MAYBE it was just weeds and overgrown neighbor trees that all needed to be cleared.  


We got most of the brush out of the way, but we still need to pull out an old trellis that we put up when we first bought the house 16 years ago.  It's in the way of our pulling out some old weed trees that have grown up between it and the fence.

Once we have everything cleaned up, we'll be able to move the blackberry plants that have rooted where they shouldn't have.

Did you know blackberries are insanely easy to grow?  I had no idea that it was so easy to root them off an existing plant...just stick the end of one of the shoots into the ground and weight it down.  It will grow roots and a new plant.  So find a friend who has some and ask if they'll root some for you.  I will never pay for blackberry plants again!

A Bunny Update

Monday, June 23, 2014

Before we get to the adorable little hoppers we have running around, I thought I would share this pic I snapped of one of my giant lilies in our side yard. 

 
These are interesting in that, well, they're huge (bigger than my hand).  But they also start out as bright orange and then gradually fade until the petals fall. You can see that this one is starting to fade already. 
 
Gorgeous!

I went out to check on the bunnies over the weekend to find their eyes open and they had almost doubled in size.  A couple of them were hopping around and one of the little guys apparently decided that just standing completely still when coming face to face with an adoring human was the best course of action in the situation, even though he was inches from our potato bed. 
 
I couldn't resist reaching down to stroke his back with a finger and, with that, he was off like a shot under the potato leaves.


Mom watched disapprovingly from a safe distance.  See her giving me the evil eye?


Since Saturday, there's been no sign of bunnies so they're either still in hiding in the safety of our new lots or Mom is off teaching them the bunny ropes.  I'm sure we'll see them again but, for now, I'm glad they're out of the garden.

I'm now off to go catch up on blogs and see what's going on in everybody else's gardens.

Toodles,

We're Expanding!

Saturday, June 21, 2014

Current Cranky Puppy Farm shown in red. The 2 new lots are in yellow.
And I'm not just talking about our waistlines.  ;-)
 
A neighbor of ours that owns two vacant lots just north of us (behind where our solar panels are going) decided he wanted to get rid of them because he was tired of mowing them and needed the money.  Luckily, he contacted us.  We've wanted those lots for about 9 years now, so I guess this does prove that patience pays off eventually.
 
The lots are level and will be a great place to put our orchard, a huge garden and some berries.  I'll probably move the bees over there as well. And this couldn't be better timing, because we need to transplant the apple trees that are currently located where the solar array is going.  Now we'll be able to dig them up and put them right back in the ground.  It's not an ideal time to be stressing them with a move but hopefully they'll be OK.
 
There's some work to be done, however.  That gray strip in the picture above to the left of the properties is a one-way street from north to south. Along the west side of the new lots, there's a retaining wall that is falling into the street and the vegetation is so out of control that it's sticking out in the street.  To avoid scratching our vehicles, I stopped driving that way a long time ago.  So the neighbors are ecstatic that we're going to be cleaning all that up.  I'd love to terrace it and put in some beautiful shrubs and flowers on the lower terrace.  Additionally, we put up a new chain link fence a couple of years ago that runs the property line between the old and new properties, but it should be fairly easy to put in a wide gate so we can get carts or a mower up there. 
 
With this addition, the possibilities are endless and we are having so much fun thinking about what we can do with the space.  We're considering joining in next summer's Urban Farm Tour, so we have a lot to do to get the new space ready for that.  So exciting!

R.I.P

Thursday, June 19, 2014

No pictures for today's post - I'll spare you the gory evidence that goes along with the very sad news I'm about to relate.  I went out tonight to check on the chickens and found my beloved Henrietta's pen full of feathers but no Henrietta.  I called to her optimistically thinking she might be hiding under the RV or tractor, but she didn't return my call with her usual soft clucks.  No answer was a good sign that I had no reason for optimism.
 
I eventually found her behind her coop and lifeless.  It appears that either a possum or,  more likely, a raccoon, pulled her through the fence and tore out her neck.   For those of you that have never kept chickens: they're silly creatures and, when faced with a threat, they will head for the corners of their enclosure.  In Henrietta's case, if she had just gone into her coop, she would have been safe.  But she made the fatal decision to "hide" behind her coop and between it and the fence, where the raccoon reached in and grabbed her.
 
I feel responsible for her death and feel terrible.  Before we moved the chicken coops for the solar project, we had plastic hardware cloth all the way around her pen and it had kept her safe for several years.  After the move, we had a lot of work to do, so we didn't replace it although it was on the to-do list.  If I had only just done it.....
 
Poor Henrietta had endured a lot during her short 3 and a half years.  I think she laid maybe 10 eggs over the course of her life, yet we nursed her and even had her living in the basement for a short time after she was bullied by the other chickens.  'Etta, as we lovingly called her, had clucked her way into our hearts by having such a big personality.  I am going to miss her following me around the yard, wanting to jump up on my knee, and the way she always clucked back to us when we talked to her.  I know she was just a chicken, but I swear she knew her name.
 
Rest in Peace, 'Etta.

What's Wrong With This Tomato?

Wednesday, June 18, 2014

I've got a weird tomato and I was hoping that someone might know what this is.


This Cherokee Purple tomato is just plain ugly.  But it seems firm and doesn't have any open cracks.  The plant is otherwise healthy and this is the only tomato on it that looks like that.  It was a small tomato when we planted the plant, so the only thing I can think of is that it's cracked as it's grown.  Perhaps the wet weather had something to do with it also?
 
At any rate, the bottom is starting to turn red in this picture and, now that we're a couple days past when I took this, it's ripened even more.  I guess we'll find out when it's fully ripe and we slice it open.
 
If you have any ideas, please leave me a comment!


I've shared this post with this week's HomeAcre Hop in hopes that someone knows what this is!
Related Posts Plugin for WordPress, Blogger...